Table of Contents
- Description
- Location
- Journal Entry
- Pre-Fight Preparation
- Boss Move Set
- Melee Attacks
- Wind / Magic Attacks
- Fire Attack
- Core Strategy
- Opening the Fight
- The Key Mechanic - Immobilize Counters Wind Form
- Mid-Fight Rhythm
- Managing the Teleport Phase
- Recommended Build for This Fight
- Rewards for Defeating the Black Wind King
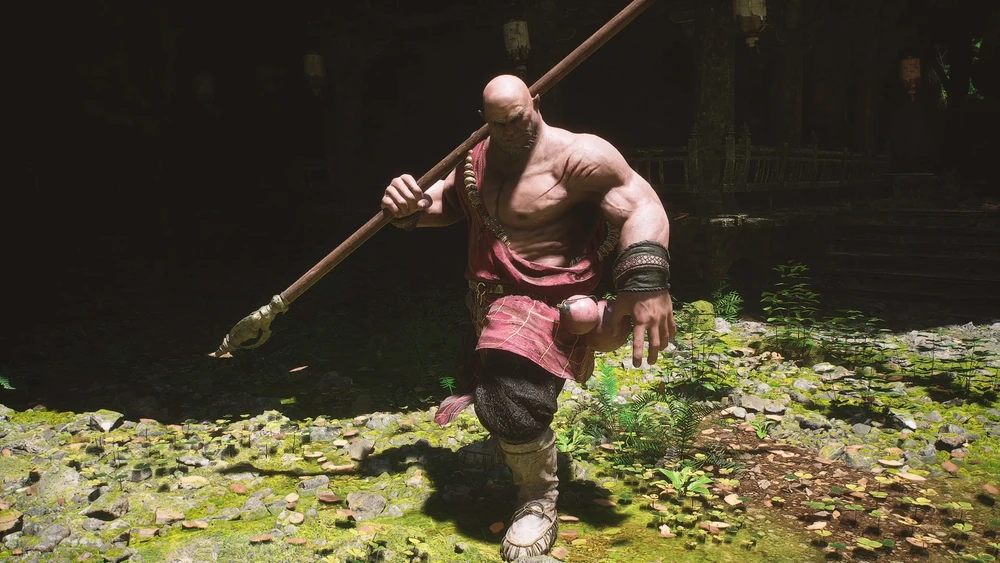
Black Wind King
| Type | Yaoguai King |
| Chapter | 1 |
| Location | Black Wind CaveCave Interior |
Description
The Black Wind King is a powerful Yaoguai King and one of the central antagonists of Chapter 1. He rules over Black Wind Mountain from his stronghold inside the Black Wind Cave. Despite his intimidating title, he takes the form of a muscular warrior armed with a long halberd-spear rather than the bestial shape you might expect. His mastery of wind magic and fire breath, combined with his ability to dissolve into an invisible mist, makes him one of the most mechanically interesting fights in the early game.
Location
The boss is located in Black Wind Cave, just past the Cave Interior Keeper’s Shrine. You will reach him naturally by following the main story path after defeating the Whiteclad Noble. Always rest at the Shrine right before the large doors to the arena, as it serves as your respawn point.
Journal Entry
Since his return from Guanyin, the Black Wind King’s spirit brimmed with grand plans. He vowed to restore his might in the mountains. He knew well that after years away, to win respect from the yaoguais, strength alone would not make them bow. So he took many steps to try to earn both awe and loyalty.
When he was with Guanyin, he learned the mantra of revival. Harnessing the voluntary self-sacrifice of wolf guais, he brought back old Lingxuzi from death. But that ungrateful old wolf left only a few words after the revival and vanished from his sight again.
The Black Wind King feared the wolf pack would fall apart without a leader. He had to choose another wolf to head the pack. A grey wolf guai who wandered here from Shituo Ridge, strong and in his prime, was a fine choice. The Black Wind King gave him the name of Lingxuzi and helped him take the seat. Yet, the wolf pack rose against their new master in the temple, and it almost led to a bloodbath among kin.
In his frustration, the Black Wind King used the mantra to try and bring back to life the old monk he used to practice with. But the soul of the monk did not return to the stitched corpse. Instead, it fused with the gold, silver, and copper coins the monk had buried in life, forming a maddened golem. It wandered and disturbed the mountain garrison day after day, never relenting.
The newly appointed White-clad Noble is far from ordinary. He typically indulges in solitary reading and poetry. Despite his outward appearance of loyalty and sincerity, he remains shrouded in mystery, making it impossible for others to fathom his true intentions.
Alas, to think too highly of oneself and then end up achieving nothing. It is true that they say, a fool with ambition is worse than a nobody.
Pre-Fight Preparation
Because this fight comes quickly after the Whiteclad Noble, your gear options are limited, but a few preparations will make the fight noticeably smoother:
- Craft the Serpentscale Battlerobe using materials obtained from enemies in the cave area. The 18 Defense it provides is a real difference-maker at this stage.
- Defeat optional boss Elder Jinchi by ringing all three bells scattered around Chapter 1. Doing so rewards you with the Fireproof Mantle, a vessel that grants immunity to Burn damage and passively regenerates Focus. This counters the Black Wind King’s fire breath completely.
- Equip the Red Tides transformation obtained from the Guangzhi boss earlier in the chapter. Its heavy attacks deal massive damage and apply a Burn effect on the boss.
- Consider equipping the Guangmou Spirit, which sends a pair of venomous snakes at the enemy and applies poison damage over time. This is useful right at the start of the fight.
- Equip the Agate Jar curio (found in the Black Wind King’s arena before triggering the fight) for an additional Defense bonus.
- Upgrade your weapon and armor at a Keeper’s Shrine before entering. Even a single upgrade tier makes a measurable difference in both attack and survivability.
- If you are wearing two pieces of the Bronze armor set, you will deal bonus damage to Immobilized enemies. Four pieces reduce the Immobilize cooldown, both options are valid for this fight.
Boss Move Set
The Black Wind King has more unique moves than most early-game bosses.
Melee Attacks
Three-Hit Spear Combo: This is his most common sequence. Three consecutive spear strikes delivered at mid range. Dodge each hit and counter after the third swing, when he has a brief recovery pause.
Jumping Spear Slam: He leaps into the air, briefly pauses, then infuses his spear with Black Wind energy and drives it into the ground with enormous force. Watch for the wind glow on the weapon and dodge sideways before he lands.
Wind-Infused Slash Flurry: Following the Jumping Spear Slam, he typically follows up with three powerful wind-charged slashes. Wait until all three land before pressing your own attack.
Spear Kick Feint: He kicks his spear forward, then retreats as if withdrawing only to immediately lunge with a stab. The retreat is a deliberate feint. Don’t rush in after the kick.
Forward Spear Charge: A rapid straight-line rush. Dodge to the side, not backward. Sidestepping gives you a free counter window.
Ground Sparks (Long-Range): At distance, he twirls his spear and drags it along the ground, launching a wave of sparks. Sprint or dodge sideways, these can be outrun.
Complex Guard-Slam Combo: A longer sequence where he pushes back against you with a guard-break motion, follows with a slam, kicks his spear up, retrieves it mid-jump with a slash, and finishes with a ground slam. Learning this sequence is valuable because it is an excellent window to use Immobilize as casting it during any phase of this combo stops him cold.
Front Kick: A simple forward kick, short range. Easy to dodge but watch for follow-up attacks.
Wind / Magic Attacks
Wind Orb Dash (Mist Form): He dissolves into a swirling mass of black wind particles and charges at you in a straight line two to four times. Dodge sideways each time and watch for the brief flash of light just before each charge, which signals the direction he will strike from. He always reforms in the center of the arena after his dashes end, giving you a great opening to land a charged heavy attack.
Wind Blade Circle: After emerging from Mist Form, he summons slow-moving wind blades that orbit him for a few seconds. These are relatively easy to dodge around. Do not stand directly on him while the blades are active.
Mist Form Afterimage / Teleport: As he takes more damage, he will use wind-based afterimages to confuse you, appearing in one location while actually approaching from another. Look carefully at where the mist retreats to identify his true position. Hitting the real version will cancel the technique; hitting a fake will trigger a counterattack.
Spear Throw: He hurls his spear forward, then retrieves it immediately and launches into wild follow-up swings. Move out of the throw’s line and prepare to dodge the swings.
Fire Attack
Fire Breath: He drinks from a gourdб then exhales a torrent of flames. Dodge or sprint to his sides or behind him. If you have the Fireproof Mantle equipped, activate it before this attack to completely negate the burn damage. The lengthy fire animation leaves his flanks and back fully exposed, making it an ideal punishment window.
Core Strategy
Opening the Fight
The moment you enter the arena, cast Immobilize immediately. The Black Wind King does not attack right at the start, so you can freeze him before he even begins his assault. This gives you several free seconds to land your Spirit Attack (Guangmou’s snakes for poison) and begin a full combo. Use the Red Tides transformation right after this and unleash heavy attacks. Between Immobilize damage, poison, and the transformation’s Burn effect, you can take off a significant portion of his health before he ever swings at you.
The Key Mechanic – Immobilize Counters Wind Form
The most important technique in this fight is using Immobilize the moment he begins his Wind Orb transformation. If you catch him at the very start of the wind-up animation, the spell snaps him back to his physical form before he can charge. This prevents what is otherwise one of his most dangerous and hardest-to-track attacks. You will need this exact same skill for the second version of this fight later in the chapter, so treat this encounter as practice.
Mid-Fight Rhythm
When you do not have Immobilize available, fall into a careful dodge-and-punish rhythm. Do not try to trade hits with him, his spear has significant reach and his combos hit hard. The safest consistent openings are:
- After his Ground Slam Combo, if he misses the final strike, he has an extended recovery period. Use this for a full combo sequence of your own.
- After he exits Mist Form and reappears in the center, charge up a heavy attack while he performs the Wind Blade Circle. The slow blades give you time to land a fully charged strike.
- After Fire Breath his sides and back are completely unguarded during the animation. Move to his flank the moment you see him drink from the gourd.
- Jumping heavy attacks are particularly effective at staggering him; look for any small recovery pause after his longer combos.
Managing the Teleport Phase
Later in the fight, when his health is lower, he teleports more aggressively and uses more afterimages. Slow down and be patient. Observe the mist before committing to an attack. Hit the wrong target and you will eat a free combo. When in doubt, wait him out, he will eventually materialize with a recognizable wind-up animation.
Recommended Build for This Fight
Weapon: Willow Wood Staff (standard) or Twin Serpents Staff if already crafted. Either is sufficient. Upgrade at least once before the fight.
Armor: Serpentscale (Snake Scale) Battlerobe for base Defense. Two-piece Bronze set if you want bonus damage on Immobilize. Four-piece Bronze if you want faster Immobilize cooldown.
Vessel: Fireproof Mantle — crucial for completely neutralizing Fire Breath and gaining passive Focus regeneration.
Spells: Immobilize (primary offensive and defensive tool). You should have it by this point in Chapter 1.
Transformation: Red Tides (Guangzhi). Activate after opening Immobilize for maximum burst damage.
Spirit: Guangmou — deploy at the start for poison damage over time. Alternatively, Wandering Wight for its stun effect.
Curios: Agate Jar (Defense, found in the arena). Back Scratcher (maximum stamina) or Cat’s Eye Beads (critical hit chance) in the second slot.
Skill Priority: Robust Constitution (health), Stagnation (extends Immobilize duration after light attacks), Deft Evasion (increased dodge distance), Simian Agility (reduced dodge stamina cost).
Staff Stance: Smash Stance is the safest and most reliable for this fight. Thrust Stance is a valid alternative for faster, dodge-integrated combos.
Rewards for Defeating the Black Wind King
- Cloud Step Spell. This is his signature teleport ability, now yours. You create a decoy that distracts enemies while you reposition for a free combo hit.
- 696 Will (experience currency)
- 1 Stone Spirit (crafting material)
The Cloud Step spell is immediately useful and you will want to practice it before the second phase of this boss fight, which takes place at the very top of Black Wind Mountain.


")